Understanding SAP GUI Scripting
SAP GUI Scripting is a game-changer in my daily work routine, making it possible to automate repetitive tasks, enhance productivity, and reduce human errors. It enables automation of SAP tasks through scripts. It provides a powerful interface to interact with the SAP GUI, allowing you to record and execute actions within the SAP GUI environment.
With SAP GUI Scripting, your SAP users can focus on more strategic, value-added activities, while automation handles the mundane and repetitive tasks.
Configuring your SAP GUI Environment for Scripting
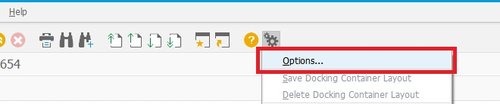
Before we start with the technicals of scripting, we need to make sure scripting has been enabled for us, the users. First, you can click on the gear ⚙️ icon, then click on the "Option" button.
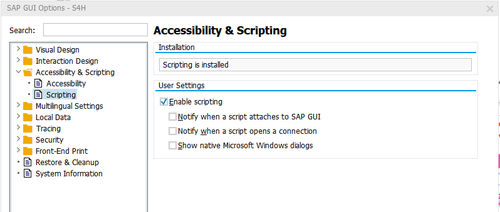
Under "Accessibility & Scripting" -> "Scripting", make sure that "Enable scripting is ticked" and the rest of the selections are unticked and click on "OK"
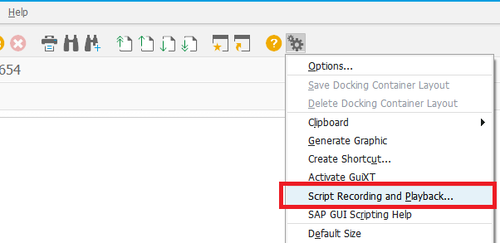
Now, click on the gear ⚙️ icon again, and check if the "Script Recording and Playback" button is available to click on. If this button is grey out, it means that your organization have disabled scripting for users in this specific server. You will need to reach out to your IT administrator to enable scripting for you.
Some organizations disabled scripting for end users in the Production environment. There's one company that I worked with where they disable scripting for end users but they allow scripting in the test environment and I am able to use that to develop my script using the test server and submit to IT for clearance subsequently so that the script can be executed in the production environment.
Once we have our SAP GUI environment configured correctly, it's time to do the fun part!
Recording your first SAP GUI Script
To record your first script is simple. Click on the gear ⚙️ icon and click on "Script Recording and Playback" .
This will open the recorder that is built into SAP GUI.
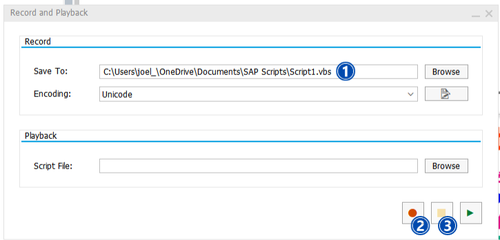
We can change the file path that we want to save the recorded script in the number 1 field. After we have determined the recorded script path, click on the record button labelled number 2 in the screenshot above.
Then, we can start to perform our routine work that we would like to perform automation on SAP GUI. The recorder will record every step we made in SAP GUI and translate that into a usable script.
Once we have completed all our steps, click on the stop button labelled number 3.
Navigate to the folder directory that we have determined in the previous step and look for the newly recorded script.
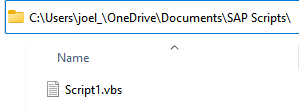
Open the recorded vbs file with a notepad, and this is our script that we can use as our base to perform our automation process.
Configuring Excel to run SAP GUI Scripts
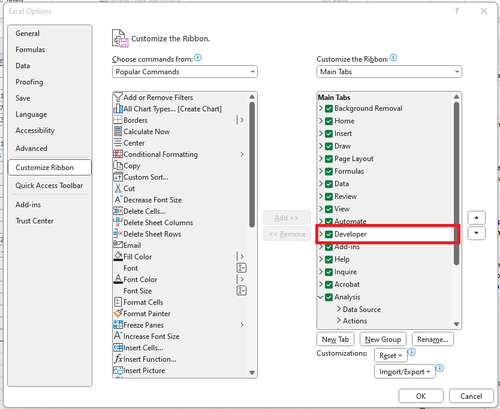
Now we need to configure Excel so that we can run our recorded script later on. First, we need to enable the developer tab. To do that, navigate to "File" -> "Options" -> "Customise Ribbon" and enable the developer tab.
Then, navigate to the "Developer" tab and click on "Visual Basic"

A new window will be opened and this is the VBA Editor which will be our main workspace for developing our script. Now we need to enable SAP GUI Scripting API so that our system can understand SAP objects. From the menu bar, navigate to "Tools" -> "References" -> "Browse".
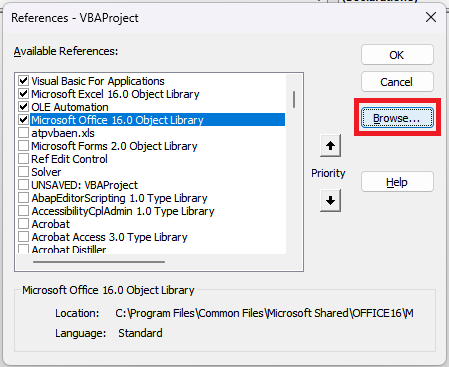
Navigate to the directory "C:\Program Files (x86)\SAP\FrontEnd\SAPgui" and look for "sapfewse.ocx". If you can't locate the folder directory, it's possible that SAP isn't installed locally, and you're accessing it through Citrix. If you can find the folder, but not able to find "sapfewse.ocx", make sure you change the file type that you are browsing on the lower right hand corner to "All Files (*)" or "ActiveX Controls (*.ocx)".
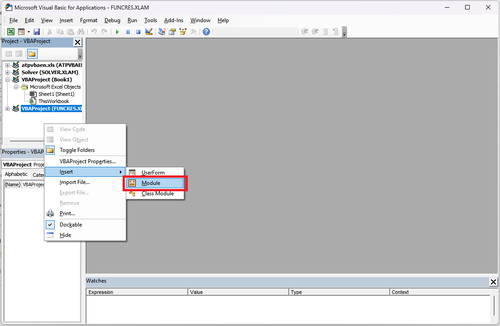
After we have enabled "SAP GUI Scripting API", right click anywhere in the Project Window and look for "Insert" -> "Module" and this will create a space for us to develop our script.
Running your script in the VBA Editor
Once you've properly configured Excel, go back to the script file you opened in Notepad. Highlight all the content in Notepad and copy it using "Ctrl+C" or the copy function. Now, head back to the VBA editor. At the beginning of your VBA script, declare four variables: SapGuiAuto, Application, Connection, and Session. After declaring these variables, create a subprocedure. Inside this subprocedure, paste the script you copied, like this:
Public SapGuiAuto, Application, Connection, Session

Sub MyFirstSAPScript()

    '' Paste your script below
    If Not IsObject(Application) Then
       Set SapGuiAuto = GetObject("SAPGUI")
       Set Application = SapGuiAuto.GetScriptingEngine
    End If
    If Not IsObject(Connection) Then
       Set Connection = Application.Children(0)
    End If
    If Not IsObject(Session) Then
       Set Session = Connection.Children(0)
    End If
    If IsObject(WScript) Then
       WScript.ConnectObject Session, "on"
       WScript.ConnectObject Application, "on"
    End If
    Session.FindById("wnd[0]").Maximize
    Session.FindById("wnd[0]/tbar[0]/okcd").Text = "/nse16"
    Session.FindById("wnd[0]").SendVKey 0
    Session.FindById("wnd[0]/usr/ctxtDATABROWSE-TABLENAME").Text = "sbook"
    Session.FindById("wnd[0]").SendVKey 0
    Session.FindById("wnd[0]/usr/ctxtI3-LOW").Text = "1/1/2021"
    Session.FindById("wnd[0]/usr/ctxtI3-HIGH").Text = "12/31/2021"
    Session.FindById("wnd[0]/usr/ctxtI3-HIGH").SetFocus
    Session.FindById("wnd[0]/usr/ctxtI3-HIGH").CaretPosition = 10
    Session.FindById("wnd[0]").SendVKey 8
    Session.FindById("wnd[0]/tbar[1]/btn[43]").Press
    Session.FindById("wnd[1]/usr/cmbG_LISTBOX").SetFocus
    Session.FindById("wnd[1]/tbar[0]/btn[0]").Press
    Session.FindById("wnd[1]/usr/ctxtDY_PATH").Text = "C:\Users\joel_\Downloads\SAP Python"
    Session.FindById("wnd[1]/usr/ctxtDY_FILENAME").Text = "FlightSalesReport.XLSX"
    Session.FindById("wnd[1]/usr/ctxtDY_FILENAME").CaretPosition = 17
    Session.FindById("wnd[1]/tbar[0]/btn[0]").Press

End Sub
And there you go! You've just wrapped up your first script. Click on the play button or hit "F5," and watch the magic unfold. SAP will start running those recorded steps in the background. That's the basics of running a script in SAP. Now, remember, you can dive deeper by declaring various variables, like current dates, fetching data from text files or Excel sheets, and injecting them into the script to make it more dynamic, running loops and so much more. But for now, this post is all about dipping your toes into SAP automation. We'll explore more advanced topics in future posts. Happy scripting!
If you are eager to unlock the power of SAP GUI Scripting, I've got you covered! I've written a comprehensive eBook that covers everything you need to know to get started.
With this eBook, you'll gain a complete understanding of the SAP GUI object model and get access to practical code snippets that will help you hit the ground running.
Get your copy now and start your SAP GUI Scripting journey today!