Snap and Automate: A Guide to Screenshot Capturing in Process Automation
Lately, I've received numerous requests on how to capture screenshots within automation processes. While logs can provide a record of script actions and SAP system inputs, there's a growing need to provide visual proof of extracted parameters. This is where screenshot capturing comes in - a way to provide tangible evidence of the data extracted, beyond just log entries. In response to these requests, I'll be sharing a guide on how to perform screenshot capturing in automation processes using Visual Basic for Application (VBA).
The Screen Capturing Function
The first step is to import a keyboard event function that simulates a key press. This handy function allows us to trigger a screenshot with just a few lines of code. To take a screenshot, we will run the function with the print screen button, which has a hex code of "&H2C". Set all other parameters to zero, and you're good to go!
Private Declare PtrSafe Sub keybd_event Lib "user32" (ByVal bVk As Byte, ByVal _
  bScan As Byte, ByVal dwFlags As Long, ByVal dwExtraInfo As Long)

Sub PrintScreen()
   keybd_event &H2C, 0, 0, 0
End Sub
Once you trigger the keyboard event function, the screenshot is instantly copied to your clipboard, ready to be shared. Now, if we press Ctrl-V or use the paste command in any Windows application (could be Excel or Word), your screenshot will be inserted as a picture.
Now, here's a crucial detail to keep in mind: If you paste the screenshot immediately after triggering the keyboard event function, you might end up with the wrong image. That's because the screenshot takes a tiny moment to save to the clipboard.
To resolve this issue, just add a brief pause after the screenshot and before pasting. This allows the screenshot to fully save to the clipboard.
I've got a handy Pause function that does the trick, temporarily halting code execution for a specified time. In my case, a short delay of just 0.1 seconds was all it took to ensure the correct screenshot gets copied every time. Problem solved!
Private Declare PtrSafe Sub keybd_event Lib "user32" (ByVal bVk As Byte, ByVal _
  bScan As Byte, ByVal dwFlags As Long, ByVal dwExtraInfo As Long)

Function Pause(sec As Single)
  Dim t As Single: t = Timer
  Do: DoEvents: Loop Until Timer > t + sec
End Function

Sub PrintScreen()
    keybd_event &H2C, 0, 0, 0
    Pause (0.1)
End Sub
Incorporating screenshots into SAP GUI Script
Take a look at this example of an SAP GUI script. When I run this script, it extracts data from the "KE5Z" tcode for a specific year and company. Then, it exports the table to a directory of my choice, with a customized filename with a timestamp.
Check out my previous article, where I share a step-by-step guide on getting started with SAP automation. It's a great resource to help you streamline your workflows and boost productivity!
Sub KE5ZExport()
    Dim SapGuiAuto, objGUI, objConn, session, CurrentTimeStamp As String, destinationDir As String, fileName As String, company As String, period As String, year As String

    CurrentTimeStamp = Format(Now, "yyyyMMddhhmmss")
    destinationDir = "C:\Users\joel_\Documents\SAP Exports\KE5Z\"
    company = "0KTE"
    period = "3"
    year = "2024"
    fileName = "KE5Z " & year & period & " " & CurrentTimeStamp & ".XLSX"

    Set SapGuiAuto = GetObject("SAPGUI")
    Set objGUI = SapGuiAuto.GetScriptingEngine
    Set objConn = objGUI.Children(0)
    Set session = objConn.Children(0)
    session.findbyid("wnd[0]/tbar[0]/okcd").Text = "/n"
    session.findbyid("wnd[0]").sendVKey 0
    session.findbyid("wnd[0]").maximize
    session.findbyid("wnd[0]/tbar[0]/okcd").Text = "/nke5z"
    session.findbyid("wnd[0]").sendVKey 0
    session.findbyid("wnd[0]/usr/ctxtBUKRS-LOW").Text = company
    session.findbyid("wnd[0]/usr/ctxtPOPER-LOW").Text = period
    session.findbyid("wnd[0]/usr/ctxtRYEAR-LOW").Text = year
    session.findbyid("wnd[0]").sendVKey 8

    session.findbyid("wnd[0]/tbar[1]/btn[16]").press
    session.findbyid("wnd[1]/tbar[0]/btn[0]").press
    session.findbyid("wnd[1]/usr/ctxtDY_PATH").Text = destinationDir
    session.findbyid("wnd[1]/usr/ctxtDY_FILENAME").Text = fileName
    session.findbyid("wnd[1]/usr/ctxtDY_FILENAME").caretPosition = 4
    session.findbyid("wnd[1]/tbar[0]/btn[0]").press
End Sub
Before running the script, we need to make sure SAP GUI is currently in focus. This is crucial because we want to capture the right screenshot. If SAP GUI isn't in focus, we might end up with the wrong screenshot.
To ensure SAP GUI is in focus, we can use the following lines of code:
Sub KE5ZExport()
    'Other prior steps...
    Set session = objConn.Children(0)
    session.findbyid("wnd[0]/tbar[0]/okcd").Text = "/n"
    session.findbyid("wnd[0]").sendVKey 0
    Dim winTitle as String
    winTitle = session.findbyid("wnd[0]").Text
    AppActivate winTitle

    'Subsequent steps
End Sub
Here's what's happening: we first return to the SAP main menu. Then, we're using the AppActivate function to put an application in focus based on its title. However, SAP's title dynamically changes, so we need to get creative. We're using the Text property to retrieve the current window title and store it in the winTitle variable. This way, we can accurately bring SAP GUI into focus and capture the screenshot we need.
Whenever I run this script, I want to capture a screenshot of the parameter page to keep a record of the parameters used. To achieve this, I'll use the debugging process to identify the exact point in the script where the screenshot should be taken.
At that point, we'll trigger the print screen function we created earlier, and the script will continue executing until the data is extracted into Excel.
Sub KE5ZExport()
    'Other prior steps...
    session.findbyid("wnd[0]/usr/ctxtBUKRS-LOW").Text = company
    session.findbyid("wnd[0]/usr/ctxtPOPER-LOW").Text = period
    session.findbyid("wnd[0]/usr/ctxtRYEAR-LOW").Text = year
    Call PrintScreen
    session.findbyid("wnd[0]").sendVKey 8
    'Subsequent steps...
End Sub
Pasting Screenshot into Excel
Once the extraction is complete, I want to paste the screenshot into a new sheet in the same workbook. This way, we'll have a clear visual record of how the data was extracted, making it easier for others to follow the same steps and ensuring transparency and accountability in our workflow.
You can refer to the VBA code below on the detailed steps:
Sub KE5ZExport()
    'Other prior steps...
    session.findbyid("wnd[1]/usr/ctxtDY_FILENAME").caretPosition = 4
    session.findbyid("wnd[1]/tbar[0]/btn[0]").press
    Dim wb As Workbook
    Set wb = Workbooks.Open(destinationDir & fileName)
    Dim ws As Worksheet
    Set ws = wb.Worksheets.Add(after:=wb.Worksheets(wb.Worksheets.Count))
    ws.Range("A1").Activate
    ws.Paste
End Sub
Here's what's happening:
We open an Excel workbook using the file path and name stored in the variables destinationDir and fileName, which is our newly exported file. This will allow us to paste our screenshot into the workbook.
Next, we're adding a new worksheet to the workbook. This will give us a new worksheet to paste our screenshot into.
Then, we activate cell A1 in the new worksheet and this will be where we paste our screenshot.
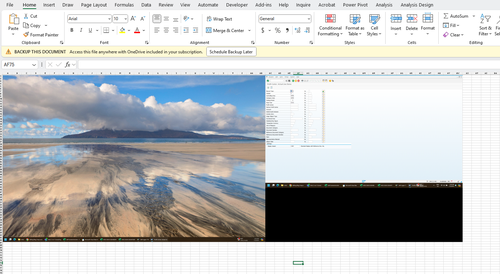
Cropping and Resizing Screenshot
Now that our screenshot is pasted, let's get it looking just right! As you can see in the screenshot, it's a bit too large for our needs, and since I'm working with a dual-screen setup, I only need the screenshot from the smaller screen. I can only see the full image at 40% zoom.
Here's how we can refine specify our screenshot using VBA:
Sub KE5ZExport()
    'Other prior steps...
    Dim wb As Workbook
    Set wb = Workbooks.Open(destinationDir & fileName)
    Dim ws As Worksheet
    Set ws = wb.Worksheets.Add(after:=wb.Worksheets(wb.Worksheets.Count))
    ws.Range("A1").Activate
    ws.Paste

    numShapes = ws.Shapes.Count
    Dim mypic As Shape
    Set mypic = ws.Shapes(numShapes)

    mypic.LockAspectRatio = True
    mypic.PictureFormat.CropLeft = 1920
    mypic.PictureFormat.CropBottom = 425
    mypic.Height = 250

    mypic.Top = ws.Range("A1").Top
    mypic.Left = ws.Range("A1").Left
End Sub
First, we need to identify the screenshot object so we can work with it.
We can do this by counting the shapes on the worksheet and grabbing the last one, which is our screenshot. Why is it the last one? That's because we just pasted it in, so it becomes the most recent addition to the worksheet's shape collection. By targeting the last shape, we can confidently grab our freshly pasted screenshot and work with it.
Next, we'll lock the aspect ratio to prevent our screenshot from getting distorted when we resize it.
Then, we'll crop it to get just the part we want. In my case, I'll trim off 1920 pixels from the left and 425 pixels from the bottom. Feel free to experiment with those numbers to get the crop just right!
Next, we'll resize the screenshot to a nice size. I'll set the height to 250 pixels, and since the aspect ratio is locked, the width will adjust accordingly.
Finally, we'll move the screenshot to cell "A1".
And here's the result! After we've refined the screenshot, it now looks like this:
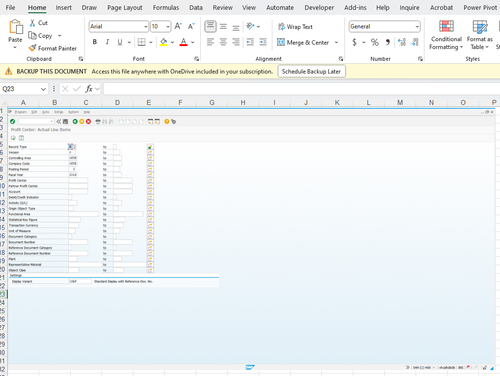
As you can see, the refinement process has successfully cropped and resized the screenshot to fit our needs. The image is now crisp, clear, and perfectly sized for our Excel workbook.
And there you have it! With this script, you've successfully automated screen capturing with VBA. You've learned how to:
1) Capture a screenshot using the keyboard event function
2) Paste the screenshot into an Excel worksheet
3) Crop and resize the screenshot to fit your needs
If you are eager to unlock the power of SAP GUI Scripting, I've got you covered! I've written a comprehensive eBook that covers everything you need to know to get started.
With this eBook, you'll gain a complete understanding of the SAP GUI object model and get access to practical code snippets that will help you hit the ground running.
Get your copy now and start your SAP GUI Scripting journey today!